In my previous tutorial, I have explained on How to Build NGINX RTMP, Setup Live Streaming with NGINX RTMP, Create Adaptive Streaming with NGINX RTMP. Please read it before start to learn this tutorial.
Deinterlace
To prevent flicker and reducing transmission bandwidth, all analog camcorders, VCRs, broadcast television systems use interlaced scan. So, deinterlacing video is in practice the process of converting interlaced video into progressive video.
Please type this command on terminal to implement deinterlace:
ffmpeg -i adam_levine.mp4 -vf "yadif=0:0:0" -vcodec libx264 -acodec aac -strict -2 -b:v 256k -b:a 32k -f flv rtmp://192.168.135.128:1935/myapp/mystream
Pic 1. Deinterlace result
If you need to turn video into black and white then this is the command
ffmpeg -i storm_spirit.mp4 -vf "yadif=0:0:0, hflip, hue=s=0" -vcodec libx264 -acodec aac -strict -2 -b:v 256k -b:a 32k -f flv rtmp://192.168.135.128:1935/myapp/mystream
Pic 2. Turn Video to Black and White
Split Screen
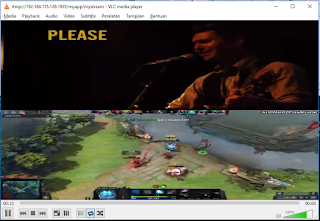
To make split screen, you can implement with this command
ffmpeg -i storm_spirit.mp4 -s 850x480 -vf "scale=850:240 [inScale]; color=c=black@1.0:s=850x480:r=29.97:d=30.0 [bg]; movie=adam_levine.mp4, scale=850:240 [vid2]; [bg][vid2] overlay=0:0 [basis1]; [basis1][inScale] overlay=0:240" -vcodec libx264 -acodec aac -strict -2 -b:v 256k -b:a 32k -f flv rtmp://192.168.135.128:1935/myapp/mystream
Pic 3. Split Screen
To implement overlay image in your stream, you can do with this command
ffmpeg -i adam_levine.mp4 -vf "movie=addies.jpg [over]; [in][over]overlay=main_w-overlay_w-10:main_h-overlay_h-10" -vcodec libx264 -acodec aac -strict -2 -b:v 256k -b:a 32k -f flv rtmp://192.168.135.128:1935/myapp/mystream
Pic 4. Overlay Image
This is the way to implement Picture in Picture (PiP). The command as below
ffmpeg -i storm_spirit.mp4 -i adam_levine.mp4 -i Slash.mp4 -filter_complex "[1:v]scale=iw/5:ih/5:flags=lanczos[pip1];[2:v]scale=iw/5:ih/5:flags=lanczos[pip2];[0:v][pip1]overlay=main_w-overlay_w-100:main_h-overlay_h-100[bg1];[bg1][pip2]overlay=main_w-overlay_w*4-100:main_h-overlay_h-100" -vcodec libx264 -acodec aac -strict -2 -b:v 256k -b:a 32k -f flv rtmp://192.168.135.128:1935/myapp/mystream
Pic 5. Picture in Picture (PiP)
Please change red color IP address rtmp://192.168.135.128:1935/myapp/mystream to your NGINX RTMP IP address
Thank you
Other Topics:
How to build NGINX RTMP module, Setup Live Streaming with NGINX RTMP module, Publishing Stream with Open Broadcaster Software (OBS), Create Adaptive Streaming with NGINX RTMP, Implementing Filtergraph in Streaming with NGINX RTMP, How to Implement Running Text in Streaming with NGINX RTMP, How to build OpenSceneGraph with Code::Blocks, How to build OpenSceneGraph with Visual Studio 2010, Building Geometry Model, How to run OpenSceneGraph with Netbean IDE 8.2 C++, Rendering Basic Shapes, Using OSG Node to Load 3D Object Model, Rendering 3D Simulator with OpenSceneGraph, How to compile wxWidgets with Visual Studio 2010


Nice article..
ReplyDeleteThank you, sir
Delete